Ricki Cooking School, Chapter 6 – Bloody Mary Salsa (and some Red Potatoes)

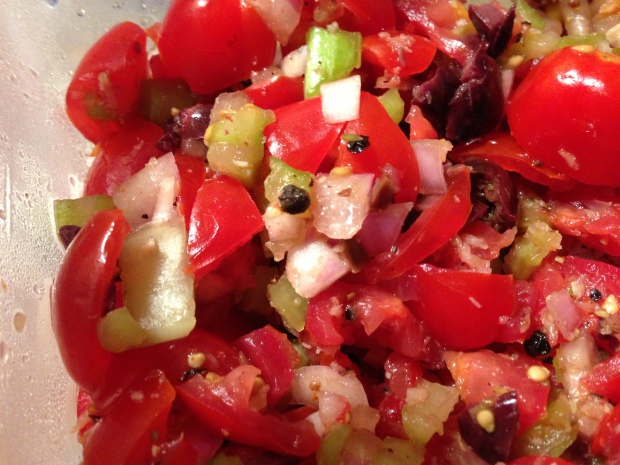
So tonight my Aunt Barbara came in and my friends were coming over and I had been thinking about making this Bloody Mary-inspired salsa. I’m reasonably sure I got the idea from Bon Appetit, but when I went to make it I just said to myself, “What’s in a Bloody Mary?” and I put that in salsa.

IMG_2106

Here’s what I did:

1. I cut up two pints of grape tomatoes, in rough pieces. Maybe 1/2″ dice? That’s what Aunt Barb is estimating.

2. I cut up three large stalks of celery, small dice.

3. I cut up one VERY LARGE lobe of shallot. I mean, huge. I don’t even know where the grocery store got shallots that big. So if you have normal-sized shallots, I’d go with three or four of those. Or you could use sweet onions, like Vidalia or Maya. But I had shallots. Huge shallots.

3. I salted and peppered the thing (kosher salt, fresh ground pepper, do I need to tell you?).

4. I chopped a handful of pitted Nicoise olives. I was thinking about using capers and they would be good too but a lot stronger. So as my lawyer mother is fond of saying, be guided accordingly.

5. I had this extra-hot horseradish in the fridge. I ended up using way more than I thought I would need, maybe about two tbsps. It really blended well but I added a little, then tasted, then added a little more, etc. So do that. Don’t add a whole glob at once; horseradish is hard to tame and how many tomatoes are you really going to buy at one time? Not enough to add more if you put in horseradish than you ought.

6. I also sprinkled in some cayenne (a very little bit!) and some celery seed. And then the tiniest bit of good balsamic vinegar. Not zomg amazing balsamic, just regular good balsamic.

Et voila! I made this about three hours or so before I served it. Maybe more than that. We got involved in some intense rounds of Rummikub so food ended up being served later than I had planned. I had intended for it to be eaten over steak but everyone seemed to eat it with their salads instead – the salad being romaine, more tomatoes, and mild blue cheese, with a very simple balsamic vinaigrette. I had it with the steak. I was right and they were wrong. But everyone seemed to like it anyway.

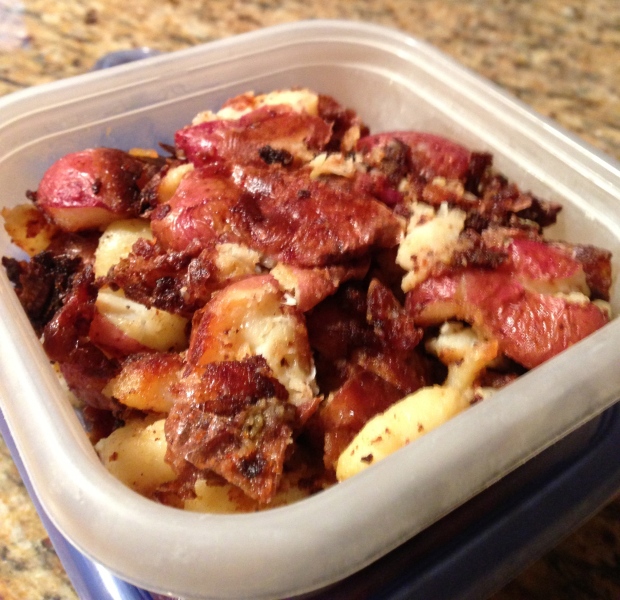
I also served these potatoes which I vaguely remember getting them from Gourmet but I make them a lot and they’re so easy that I don’t really remember their source. And they are unbelievably delicious.

IMG_2105

1. Two pounds of little red potatoes. Boiled. Not too much. Fork tender but not mash-able. (You could use virtually any potato in this recipe. I used little red ones. If you use larger ones, it will be more of a pain in the butt.) After boiling, you can either use them right away or store them for later. I almost always store them for later because I generally boil them when I get home from the grocery store and figure out what I’m going to do with them later. Also, in this particular recipe, I think using them cold is helpful for the next step.

3. Lay them out flat on a baking sheet or large, flat platter. Smash them each with a fork. You don’t want them to completely lose their shape – although that will happen with some of them and it is no big deal — but you want lots of nice nooks and crannies to get all crispy. (And this is why it’s better if they’re cold – they’ll hold their shape better.) Also sprinkle some salt on them at this stage. And, if you want, some other spice. I haven’t but it certainly wouldn’t hurt. Just not cayenne – you will never be able to shut up your smoke detector.

4. Heat some oil in a pan. You want an oil that can take high heat. I usually use peanut, which really is the best for anything potato, but vegetable, canola, safflower, grape seed, even avocado oil – anything that can take high heat – would be fine. Extra-virgin olive oil would not destroy this dish, but that oil shouldn’t be taking this high heat, really. So if you have nothing else, fine, but why don’t you have anything else? Get something else.

5. Add potatoes in batches to the hot oil. Don’t crowd them. You want every nook and cranny to have its space to get nice and crispy.

6. As you take each batch off and put it in a bowl (I forgot this time but you really ought to line the bowl with paper towels to absorb the oil. Not that anyone seemed to mind.), grate a little Parmesan cheese over it. Or some other cheese, if you like. Just freshly grated by you with a microzester or very tiny-holed grater. (I love the microzester. It grates so easy!)

And potatoes! Yum, yum, ooh, delicious!

These should really be served right away, but like I said, Rummikub happened. So I heated them a little in the microwave. You know what? Once you fry something in oil and sprinkle Parmesan cheese on it, it’s really hard to fuck it up.
 

Ricki Cooks the Book – Tender

IMG_1930So I got Tender: A Cook and His Vegetable Patch, by Nigel Slater, last year, and it is lovely. It’s divided into chapters by vegetable and has beautiful pictures of vegetables in and out of the dirt and in and out of their dishes. Each chapter opens with a little dissertation on the vegetable, and then there is a section on growing that vegetable, “A (vegetable) in the garden,” with helpful hints and annotated list of favored varieties, and a section on cooking that vegetable, “A (vegetable) in the kitchen,” with a few paragraphs on what to do with the vegetable, followed by a list of its best pairings, and then a list of helpful hints and suggestions. Then each vegetable gets a few recipes, and then on to the next.

But the best part about Nigel Slater is his prose. He’s so evocative, so delightfully descriptive, and so poetic, that it elevates even the concept of cooking and gardening, not to the latest third-wave feminist, privileged white girl trend (and look, I know, I AM  third-wave feminist privileged white girl), nor to some sort of quasi-libertarian hipster-mustache-tattoo-post-90s-masculinity thing (and I say this having eaten at Blokes and Birds on Friday), but to high art. Like, for instance, I have no love of the celery root, but here’s what he says:  “Knobbly, whiskery, and impenetrable, its roots curled around its feet like a viper’s nest . . .” Like, hot damn.

What about this comment on health-food stores?

To this day I wouldn’t go anywhere else for my lentils and beans, though I can live without the crystals and self-help manuals. There is something endlessly reassuring about their rows of cell0phane-encased dates and haricot beans, their dried nuggets of cranberry, and jars of organic peanut butter. And where else can you get a incense stick when you need one?”

Love, is what I’m saying. Love this man.

So what I ended up making, from this 600+ page tome, is:

A light touch for meatballs

That’s not a typo; all the recipe titles are like that.

Here’s how he starts:

Late spring, 2007. Six small beets, round as golf balls and not much bigger, arrive in a thick brown paper bag, its edges sewn together with string. The air of moist Riverford soil and sweet roots wafts up as the bag is torn open, but the day is leaden with damp and cold and I have rarely felt less like eating a beet salad.

Good lord, y’all.

So these are meatballs made of lamb, beets, and cracked wheat. Weird. And delicious. As usual, I offer the recipe, with my changes/commentary.

Ingredients:

fine or medium cracked wheat – 1/2 cup (75 g) (Available from bulk bins at Whole Foods as well as health food stores, I imagine.)

raw beets – 9 oz (250 g) (Don’t bother paying more for the pretty ones for this recipe. It’s all being grated up.)

a small to medium onion (I didn’t realize I didn’t have any, so I used some shallots.)

ground lamb – 14 oz (I might have gotten a whole pound; I can’t remember saying “14 oz” to the butcher, as that would have made me feel like an idiot.) (Oh, and don’t get to the store and be like, “That’s how much lamb costs?! Never mind, I’ll just make it with beef.” The lamb flavor is important here.)

garlic – 2 large cloves, or even 3, crushed (Seriously. 2-3 cloves? I put in a whole head. Maybe, like, 2/3 of head. Probably a whole one.)

chopped dill – 2 heaping tablespoons (Okay, so here’s what happened. I bought fresh dill from Whole Foods. Even though I don’t like dill. Because Nigel Slater said dill and I wanted to trust him. But I seriously hate dill. By the time I got it home, it had stunk up everything in my grocery bag. Then everything in my fridge. The smell was making me nauseated. So I tossed the dill. I feel terribly wasteful but I really couldn’t take it. So no dill in my recipe.)

parsley – a small handful, chopped (I always use flat-leaf. You can do as you see fit.)

a little peanut oil

For the dressing:

cucumber – about 1/3 of a medium one

mint – the leaves from 4 or 5 sprigs, chopped

capers – a tablespoon (He didn’t say to, but I chopped these, too. I thought that would be better.)

yogurt – 1/2 cup (200 g) (I hope I don’t need to explain, but this means plain yogurt. Greek or Finnish if you like. But no, like strawberry or banana.)

Directions:

1. Put cracked wheat in a boil, pour over enough boiling water to cover, then set aside to swell. (Okay, so, typing this, I see now that he did say “boiling”. My water was not boiling. Which is perhaps why my cracked wheat didn’t swell as prettily as it did in his picture. Maybe it would have tasted lighter if it had.)

2. Peel beets and onions and grate them coarsely into a large bowl. (So, a) You need to know that peeling your standard red beets is a messy business. Don’t wear white. Don’t smear your hands on your clothes. Wash your hands thoroughly afterwards. b) “Coarse grating” = “the large holes on the box grater”. c) I didn’t use onion, so I just chopped my shallots. But I like in general the practice of grating onions.)

3. Add ground lamb, dill (if using), parsley, and “a generous grinding” of s&p.

4. Squeeze water from cracked wheat with your hands (Yes, kind of gross) and add to meat. Mix everything thoroughly and then form into patties about the size of a flattened golf ball. Cover with plastic wrap and chill for 1 hour.

5. Preheat oven to 350F. Make dressing by grating the cucumber coarsely (big holes on the box grater). Leave in a colander for a half-hour, sprinkled with salt. Squeeze dry, then mix with mint, capers, and yogurt. Season with salt and pepper. (I’d totally add lemon to this next time. Just saying.)

6. Lightly brown the patties in peanut oil in a skillet on each side. (I may have over-browned some of them.) Lift into baking dish and finish in the oven for 15-20 minutes. (Mine took 20.) Note: The red of the beets will make it tough to tell if the meatballs are done by look. You’ll have to taste. Which will be such torture.

So then you serve the patties with the cucumber yogurt dip and it’s super-delicious. It’s a light meal or a heavy snack. I would totally make them again. And Jason loved them.

Ricki Cooking School, Chapter 5 – F*cking Awesome Chicken Skewers

I made these f*cking awesome chicken skewers Sunday. And then we made the rest of them tonight. Here they are:

And I feel terribly pleased with myself for them because I sort of made them up. I mean, I took a couple of different recipes and put them together. And they were f*cking awesome. I love them so much; this is my new go-to recipe (or base of a recipe) and here’s how I did it.

First I bought a shit-ton (actually way too many) boneless, skinless chicken thighs. Now, here’s the thing. Chicken thighs are a pain in the ass to cut up into skewer-able squares. If you want ease of cutting up, definitely go boneless, skinless chicken breast. But chicken thighs are a lot more delicious. They hold their moisture better.

So anyway, I found this recipe and pretty much used this marinade on the chicken. I dredged the chicken in salt, pepper, and Aleppo pepper (The recipe called for cayenne, but I found my Aleppo pepper first, so I used that). Then I made twice the honey-maple syrup sauce – 2/3 cup maple syrup (the good kind, the real kind, not the Aunt Jemima colored corn syrup), 1/2 cup Dijon mustard, a few good splashes of cider vinegar (2 tbsp would be double the recipe, but do I need to tell you I didn’t measure?), and a strong splash of soy sauce.

I marinated the cut-up chicken thighs for a few days. You don’t have to do it for a few days. What happened with me was, the barbecue was Sunday, but Jason had planned an awesome anniversary date that would be basically all day Saturday, and then staying overnight downtown, so I knew I couldn’t do this the night before or even the morning of the barbecue, so I did it Friday. But you could probably marinade overnight or even early in the morning.

Then, inspired by this recipe, I cut up some peaches and got some sage leaves and skewered them all up! I used about two peach pieces – I quartered the peaches, then cut that in half, so I’m talking large-bite-sized peach pieces (but the picture above has smaller pieces because it was made today and I had run out of peaches) – and four sage leaves per skewer. Obviously, that’s to taste, although sage is a strong flavor so go easy on the leaves. Then I poured the leftover marinade over the skewers and handed them to Jason, who grilled them up! And oh my God they were so f*cking awesome, you guys. I cannot recommend this enough.

Ricki Cooking School, Chapter 4 – Panzanella

It is time.

It should not be time yet. Were I a good local/organic/seasonal cook, this wouldn’t be going up – or even be made – until August. But dudes, I crave this salad. I start making it as soon as I can vaguely justify the purchase of tomatoes in the supermarket. It is better if you wait. But I didn’t.

So, for a panzanella, what you need are:

1. Tomatoes

2. Bread

Everything else you put in is your choice. Actually, even the tomatoes are sort of optional; you can make a “spring” panzanella with, oh, say, asparagus and radishes (I have; it’s delicious) or a “fall” panzanella with Brussels sprouts and pears (I haven’t; I will). But the non-qualified panzanella is tomatoes and bread.

I wrote about how I do the bread here but I’ll repeat it in case you don’t feel the urge to click my link and give me another page view. And also because it’s the most important part of the panzanella. Now, this is not necessarily the traditional way to do it. A lot of recipes would just have you throw in slightly stale bread in chunks; some might have you toast it. But this is how I do it, and it’s delicious.

1. Get good bread. I like a sourdough, a Tuscan, a Country – something thick and dense and crusty.

2. Cut in thick slices. Lay slices on baking sheet. Set oven to Broil. (Or use your toaster oven.)

3. Drizzle bread with olive oil and sprinkle with good salt – sea salt is a good idea; kosher salt is fine. Not table. Never table. Why do you even still have table salt?

4. Put under broiler or toaster and watch it. When it’s nice and brown, take it out. This can take anywhere from 3 – 6 minutes; the key is, WATCH IT. Every variety of bread I buy takes a different amount of time.

5. While it’s broiling, get out a garlic clove and slice it so you have a good chunk to hold in your hand and a raw edge. I usually just lop the top off the clove; if it’s big, you can cut it in half.

6. When the bread is done, take it out and rub the garlic piece all over it. The bread must be hot when you do this, so be careful. Spear the garlic piece on a fork if you have to.

7. Flip the bread. Re-oil if necessary. Re-salt. Brown. Rub garlic. The browning will take slightly less time the second time around than it did the first. WATCH THE BREAD. Do not leave the kitchen.

8. For the salad, take the bread out, and, once it’s cool enough to handle, cut or rip it into large bite-sized pieces.

This sounds complicated but it’s not. Toast olive-oil-ed bread. Rub with garlic. Done. It is also completely delicious.

Okay, so what about the rest of the salad? Well, get the best tomatoes you can find. Cut them into large bite-sized pieces. What else? I usually like some cannellini beans. Or Great Northern, but, while I prefer Great Northern in my favorite pasta dish (with broccoli rabe and sausage – I’ll post that some other time), I prefer cannellini here. I almost always use basil leaves, too, torn into fairly large pieces or julienned all pretty. If I can’t get basil, or if I want more greenery, I use arugula. The last time I did this, I also used spinach, because I was trying to go super-green. Another lettuce – romaine, radicchio, maybe butter or Boston, although those are a little soft – is fine, too, if you want more green. Also very good are fresh, fresh, fresh cucumbers, either in thin slices or somewhat larger chunks, and/or raw red onions in slices. Capers, which are included in some traditional recipes, or even olives never hurt anything. I’ve been known to throw in mozzarella, cubed, although not lately, because, even with the oil-soaked bread, I like to pretend this salad is healthy. Although a few curls of Parmesan would be nice. I have, in the past, put in corn, either raw or briefly sautéed, but I’ve decided not to do that anymore. You don’t really need to dress this salad, but I usually swirl in a drop of olive oil or a nice nut oil or something, and a splash of champagne vinegar or lemon juice, plus (always) a grind of pepper and maybe a sprinkle of salt, although I keep in mind that the bread is already salted. I’ve seen people recommend topping with roast beef or fairly rare steak slices, or grilled shrimp, or maybe tearing up some prosciutto or what have you. None of these are bad ideas.

In fact, with this salad, nothing is a bad idea. Just put in what you like. I make this differently almost every time I do it. Here is the thing – it’s hard to screw up something when you’ve started with delicious, oil-soaked, garlic-rubbed, toasted bread.

Ricki Cooks the Book – My Father’s Daughter

Yeah, this is Gwynnie’s cookbook.

I know, I know, I had mixed feelings, too. She was on the cover of Bon Appetit the same month the new editor took over and my first thought was, if this is where Bon Appetit is going, I’m canceling my subscription.

Then I made her corn vichyssoise. You know what? It was really good. (And you know what else? The new Bon Appetit under Adam Rapoport is pretty sweet, too.)

Then I saw her cookbook on sale at the boardwalk for 25% off! How can you not?!

And then it sat on my shelf.

I wanted to do a post on it for a while, but I couldn’t decide what to make. Things were either too simple for a blog post, or they were things I already knew how to make, like puttanesca or panzanella, or they were fish, which Jason doesn’t eat, or they involved products like duck bacon. Duck bacon. I ask you.

But then I decided to do a whole meal of her recipes so that I could cover the meal instead of highlighting one individual, too-simple recipe. So here’s what I made:

Ten-Hour Chicken

Ingredients

1 organic whole chicken, (3-4 lb), washed and dried according to Gwynnie’s Salt Scrubs for poultry, in which you rinse the chicken in cold water, then scrub it with coarse salt, such as kosher, and then rinse it again and dry it thoroughly. Yes, I did this. Yes, I felt like a dipshit. Is there a reason I should continue doing this or was I right to feel like a dipshit?

1 lemon, halved

coarse salt

freshly ground black pepper

1/2 bunch fresh thyme (Unfortunately, I made this recipe a while ago, and I don’t remember if I used thyme or if I chose something else. I don’t really like thyme, so when a recipe calls for it, unless I really, really think thyme is the right thing, I usually pick marjoram or something.)

half a head of garlic, peeled (Do I need to tell you at this point, I probably used a whole head?)

1. Preheat oven to 200F.

2. Place chicken in rectangular roasting dish breast side down. Sqeeze lemon halves over chicken. Generously sprinkle with salt and pepper. Tuck thyme, lemon halves, and garlic in the cavity; place any extra garlic cloves around the pan. Wrap tightly with aluminum foil and put in the oven for, no joke, 9 1/2 hours.

3. Take chicken out and boost heat to 400F, on convection if possible. Unwrap, flip the bird over, and sprinkle with more salt and pepper. Roast for 15-20 minutes, until it’s nicely browned. Let chicken rest, then carve and serve.

Here is the thing about this one. You must cover the chicken in foil. I? I did not.

It actually wasn’t bad, just really very dry.

Oh, and I bought the super special chicken at Whole Foods, the kind that’s been given its own 2 acres to peck at and a lullaby sung to it each night. The kind that doesn’t grow to be 3-4 lb. So I bought two. And then I fucked them up.

Crispy Potato and Garlic Cake

Ingredients:

2 large baking potatoes, peeled (Do I need to tell you? I didn’t peel them. I don’t think.)

1/4 cup plus 1 tbsp duck fat (I just used butter. But then I discovered my Fresh Market does, in fact, sell duck fat. So, you know, next time.)

1/4 cup extra-virgin olive oil

3 cloves peeled garlic, 2 crushed, 1 very finely minced

Coarse salt

1 tbsp chopped fresh parsley (I left this out)

1. Preheat the broiler

2. Boil the potatoes. Then let them cool. Then slice them in 1/8″ thick slices.

3. Heat a spoonful of duck fat/butter and a spoonful of oil in a large, non-stick frying pan over medium heat. Add one crushed garlic clove and as many slices as can fit in one layer. Cook until lightly browned. Remove to paper towel=lined plate and repeat, switching out garlic when it gets too brown.

4. Coat a small (6 – 8″) cast-iron pan with the tablespoon of duck fat/butter. Line bottom with single layer of potato slices. Sprinkle with salt. Add another layer. Repeat this process, pressing down each layer with the back of a spoon as you go. Don’t be gentle with the pressing. Stick cake under broiler until really browned and crispy, 5 minutes. Invert onto plate and scatter with minced garlic, parsley, and more salt as needed. Cut into wedges and serve.

Okay, so here’s the thing. I didn’t have duck fat. The smallest cast-iron pan Jason could find when I sent him to the store was 10″. So it didn’t cake like it was supposed to. And I think I threw some garlic in between the layers of potato cake. And it was an enormous pain in the ass from start to finish, oh, my God.

But it was still delicious.

Roasted Cauliflower

Ingredients

1 head cauliflower, core discarded, in smallish florets

2 tbsp extra-virgin olive oil (Seriously, put your measuring spoon away and just drizzle)

pinch coarse salt

pinch fresh pepper

1. Preheat oven to 450F.

2. In baking dish large enough to hold cauliflower in one layer, toss all ingredients together. Roast 35 minutes, or until it looks delicious.

This recipe is sort of what this cookbook is mostly about. It’s simple to the point of “Duh” but it’s delicious. Seriously, when vegetables are this good, why am I fat?

Oh, right, because potatoes are good, too.

Bitter Greens Salad with Anchovy Vinaigrette

Dressing Ingredients:

6 olive oil-packed Spanish anchovies

2 tsp Dijon mustard

2 tbsp red wine vinegar

1/3 cup extra-virgin olive oil

freshly ground black pepper

Whiz all ingredients except oil and pepper n blender. Then with motor running, pour in oil. Then use pepper to taste.

Salad Ingredients:

1 large head escarole or puntarelle (what?) or 2 heads radicchio, washed really well and torn into small pieces (In fact, I think I mixed radicchio with some arugula and maybe one other green.)

Uh, serve.

Seriously, put lettuces and dressing together. Then eat it. I don’t know how to do instructions for salad.

Okay, this was super-unbelievably delicious. The dressing was to die. I haven’t made it since, but thinking about it now, my head is going, “Nom, nom, nom, give me MOOOOORE.”

Figures the best things Gwynnie could teach me how to make are vegetables.

Ricki Cooks the Book – ‘wichcraft

This is the second installment in my new series wherein I take a cookbook I wanted desperately, bought, and then proceeded to stare at the pretty pictures of and not at all cook from for a good long time. And it’s the first one where I’m actually doing that, because the first installment involved a book I’d just purchased.

So I cooked from Tom Colicchio’s ‘wichcraft.  For the none of you that don’t know, Tom Colicchio is the head judge on “Top Chef”. I pretty much love him on “Top Chef.” I think he’s really smart about food, and I think he has a very clear point of view when he cooks, but I also think he’s very good about judging the cheftestants on their own terms. He tries to understand what their point of view is, and what they’re trying to accomplish with their food, and then judges them on how well they’ve lived up to that. So as embarrassed as I am to be using a “celebrity” cookbook, I do really like and respect Tom.

I have not, sadly, eaten at any of his restaurants. Because I don’t live near any. And we rarely have the breathing room, when I’m in NJ, to go into the city and go out someplace nice. Maybe soon.

In any event, this book comes out of his ‘wichcraft restaurants, where he basically crafts the best sandwiches he can make. In fact, the tagline for the book is “Craft a sandwich into a meal – and a meal into a sandwich.” And it’s done in conjunction with his ‘witchcraft dude, Sisha Ortuzar.

So I chose to make the Pork Sausage with Pickled Grilled Fennel, Ricotta, and Arugula. Here’s the recipe:

Ingredients:

1 bulb fennel, halved and cut lengthwise into 1/4″ slices (I used two bulbs. And now, surprise surprise, I have leftovers.) (I had no idea what he meant by ‘halved’ in this context, so I just sliced them as I thought proper.)

5 tsp extra-virgin olive oil (Do I need to tell you I didn’t measure this out exactly?)

kosher salt and freshly ground pepper (Are there people who would pick up this book who don’t already know to use kosher salt and freshly ground pepper?)

2 tsp white wine vinegar (Again, did not measure exactly.)

1 lb bulk sweet Italian sausage (not in casing) (Okay, so I got “country style” sausage at my local Fresh Market. Because that’s not quite the same as Italian, I added some oregano and fennel seeds and crushed red pepper to the meat to give it some more flavor. I added too much crushed red pepper.) (Also, Tom does note – or, rather, Rhona Silverbush, who wrote the text, helps Tom note – that you can just buy links and cut the meat out of the casings. It’s not hard.)

2 cups arugula

1 tsp balsamic vinegar (Again, do I need to tell you?)

4 ciabatta rolls

8 oz ricotta cheese (And for the last time, do I need to tell you?) (Also, I bought just the regular ricotta cheese at Fresh Market. I should have held out for the homemade stuff.)

1. In a bowl, toss the fennel with some oil and salt and pepper. Then put it in a grill pan or over a grill on high heat. When it’s slightly charred (The book says one minute; it took me a lot longer than that. Then again, I was using a skillet.) remove and transfer to a bowl with the white wine vinegar. Toss and let sit for an hour or more.

2. Form sausage into four patties. Cook in skillet with a little oil, five minutes a side.

3. In a bowl, season arugula with balsamic vinegar, salt and pepper.

4. Cut ciabatta rolls in half. (No, seriously, he tells you this. Man, if you don’t know “cut roll in half” is a major part of making a sandwich, I think this is not the book for you.) Place fennel on bottom. Then sausage patty. The ricotta. Then arugula. Then other half of roll. Voila! Sandwich!

So, my take? Well, for one thing, Jason, of course, needed to slather his in barbecue sauce before he liked it. For another, the ciabatta rolls I got at Fresh Market were simply too hard. I think either not ciabatta or some other bakery’s ciabatta next time. Fresh Market’s bakery has other good stuff. But not so much the ciabatta rolls.

Finally, it struck me that this was a case where this would be a better meal than a sandwich. As a sandwich, the ricotta tends to slip everywhere and maybe I didn’t cut it right, but the fennel is sort of hard to handle. If I served crumbled sausage, ricotta, pickled, grilled fennel, and arugula over pasta, that might have been tastier.

Is that just because I think everything is tastier over pasta?

Actually, you know how this would be really amazing? If I took all the ingredients, chopped them up real small, and stuffed ravioli with them.

Ricki Cooks the Book – Ancient Grains for Modern Meals

I have, approximately, 1,882 cookbooks. I have cooked food from approximately five. I think it’s time to rectify that.

And to make myself in some way publicly accountable, I’m going to write about cooking from books I haven’t cooked from before! One recipe from each book, and I’ll report it here.

My first entry in this column will be the fig-and-goat-cheese muffins from Ancient Grains for Modern Meals.

Now, this is a little unfair for two reasons. One, it’s a brand-new cookbook. I’m 99.9% more likely to cook a recipe from a brand-new cookbook than one I was really excited to get but didn’t cook from immediately. Two, the reason I bought the book was to make these muffins. My friend got the book as a present – and it’s also been featured on many, many Best Of . . . lists – and I flipped through it at her house and I saw these muffins and I wanted them in my mouth right now. So it wasn’t, like, this great act of discipline that I brought myself to cook from this book or anything.

Ancient Grains for Modern Meals is a book that most people will buy in an effort to be healthy. The author, Maria Speck, does remind you in the beginning of the book that just because it has whole-grains doesn’t mean it doesn’t have other delicious and sinful things in it and these muffins illustrate that. Sure, one uses entirely whole wheat flour, and olive oil and buttermilk instead of, I guess, butter. But there’s still sugar and goat cheese and it’s not exactly health food, people. But it’s better for you than the average muffin and it’s totally delicious.

So here’s the recipe:

Filling:

3/4 cup (3 oz) crumbled mild soft goat cheese, at room temp

(It should be noted that the goat cheese doesn’t have to come crumbled. You can just crumble it as you remove it from the package. You probably already knew that, though, right?)

2 tbsp honey

1 tsp finely grated lemon zest

1/4 tsp vanilla extract

(I should probably also not have to tell you at this point that I wasn’t all that cautious about amounts here. It’s the filling; not the cake. You can be haphazard. So I had the amount of cheese right but I guessed on the honey and vanilla and I’m sure I grated more zest into the bowl than that. And it was definitely noticeable that I did in the final product, but in a delicious way.)

To make filling: Mix all that stuff up with a fork until it’s smooth. Let sit at room temp.

Muffins:

2 cups white whole wheat flour (though, having made them, I think standard whole wheat flour would have been fine)

1 1/2 tsp baking powder

1/2 tsp baking soda

1/2 tsp fine sea salt (or whatever good salt you usually use – not table!)

3 large eggs, at room temp

3/4 cup packed dark or light brown sugar (I used light but only because I couldn’t find the dark in my mess of a pantry. Next time I will use dark.)

1 tsp vanilla extract

1/3 cup extra-virgin olive oil (I always only have extra-virgin olive oil but if you have regular olive oil I’m sure that would be fine.)

3/4 cup lowfat buttermilk (Every recipe I’ve seen calls for lowfat buttermilk. I’ve never seen non-lowfat buttermilk in the store. Does such an item exist?)

1 cup chopped dried figs (about 10) (I used way more figs than this, I think)

3 tbsp turbinado or granulated sugar, for sprinkling (I used Sugar in the Raw, which may be the same thing as turbinado sugar)

To make muffins:

1. Preheat oven to 4oo degrees F. Butter or spray a 12-muffin pan.

2. Whisk together flour, baking powder and soda and salt in a large bowl. Make well in center.

3. In med bowl, whisk eggs. Add brown sugar and vanilla, then olive oil and buttermilk, until smooth. Add eggs to flour and stir with rubber spatula until just combined. The batter should look lumpy. Fold in figs.

(I messed up and just added the eggs to the flour right away, and then the sugar and vanilla, etc. I think it turned out okay but next time I will try not to mess up and see if they turn out better.)

4. Fill each muffin cup about half-full. Then put a little bit of the cheese mixture in the center of each. Then top with the remaining batter, such that the cheese is not visible. Sprinkle with turbinado sugar.

5. Bake until muffins look done, 13 minutes or so. (I think mine took fifteen.) “Looks done” = nice dome, browned edges, springy tops. Let cool 5 min, then remove from pan. Eat or save.

I have found these muffins to be totally delicious. Jason seems neutral. Zoe condescended to pick a few crumbs off of one.

Ricki Cooking School, Chapter 3 – Garlic Bread and Tomato Soup with Pesto

I made this tonight and my husband said, “You should write this stuff down.” So I am!

(I’m also wondering if he’s planning to kill me, but still wants his next wife to cook his favorite foods. But probably not. Right?)

So, garlic bread – Buy good bread. Seriously. Don’t chintz out on this step. I like a nice “Country Loaf” or “Tuscan Loaf” or something like that. Sourdough would not be bad either but it’s a little on the dense side.

Then you slice it. Maybe 3/4″ to 1″ thick. (You should keep in mind, as you read that, that I am guessing based on how thick I cut it, and I have no spatial perception at all.) Lay it out on a baking sheet. Drizzle generously with olive oil and sprinkle some good-quality salt. Sea salt in a big grain if you’ve got; kosher salt if you don’t. Don’t use table salt. In fact, if you’re even thinking, “Wouldn’t table salt be fine?” at this step, just go to the freezer section of your local grocery store and buy Texas Toast or something. Don’t bother with this recipe.

Put the bread under the broiler and WATCH IT. Usually four to five minutes is a good estimate, but don’t leave the kitchen and check frequently until you’ve got a good handle on how fast the bread you prefer toasts in your particular oven. While you’re checking, take one garlic clove, big as you can get, and slice the top off. (You don’t have to peel it but you might want to sort of jimmy the peel away from the top a bit.) Once that side of the bread looks good to you, take it out of the oven and, as soon as you can, rub the garlic clove over all the bread thoroughly. You’ll need to use an oven mitt on one hand to hold the pan and you’ll need to move quick and careful with the hand holding the garlic, but if you don’t do it while the bread is hot the garlic won’t get absorbed properly.

Then turn the bread over, re-salt, and re-olive oil if necessary (It’s frequently not necessary unless you’ve got a dense bread). Then stick it back in the oven, usually for a minute less than the first time. Then repeat the action with the garlic.

And, voila! Delicious garlic bread. I use this as croutons in salad, I use this for my panzanella (which I’ll put up in the summer), I use it for all sorts of reasons. I rarely serve bread without doing this to it first.

As for the tomato soup, I vary it a lot, so I’ll tell you what I did tonight. First, I cut up a shit-load of garlic cloves. I sautéed them in the bottom of a large pot with olive oil, salt, and crushed red pepper. (Sometimes I get fancy and crumble up some chiles de arbol instead.) Then I dumped in two cans of San Marzano crushed tomatoes.

Two notes:

1. IT MUST BE SAN MARZANO. “But I always use Del Monte!” No. San Marzano. “But what about organic Whole Foods brand?” No. San Marzano. “But what about locally grown-” No. San Marzano.

2. I know I’m supposed to use the whole peeled San Marzano tomatoes and blend them with my immersion blender, but, as easy-peasy as using the immersion blender usually is, tonight I was making four different cookies while making the soup so I just did the crushed and I didn’t even bother to blend them. Personally I usually like the soup a little smoother, and missed the immersion blender action, but Jason was all over it.

So that was basically it. I heated up canned, crushed (SAN MARZANO) tomatoes. Delicious.

Normally I would swirl in some lightly chopped basil leaves at the end there. But the thing was, I had planned on making this soup, like, a week and a half ago. Then Jason broke his arm and we just had take-out for days and days and days because he likes take-out. So somewhere last week I decided to turn the basil I had bought, and the cilantro left over from something else, into pesto. Here’s how I did that: Zoe and I took a whole bunch of basil, a whole bunch of cilantro, three or four peeled garlic cloves, about half a hunk of parmesan cheese, a pinch of salt, and a ton of walnuts and tossed them in the food processor. With the machine going, I helped Zoe pour olive oil in until we got a sort of paste-y texture. If I were planning to serve it over pasta, I would have tried for a more liquid texture, but since it was going in soup, the paste was perfect. Incidentally, making it more liquid involves EVEN MORE olive oil, so if you are making pesto for pasta, and don’t want to add EVEN MORE olive oil, just toss the pesto and pasta with a little of the pasta cooking water to thin it. It doesn’t make pesto health food, exactly (although honestly, if you’re not trying to actively lose weight, pesto is pretty healthy), but it’s a little better.

Then I threw some lemon juice in there so the basil wouldn’t turn brown and left it in the fridge for a few days, until I finally got around to making the soup. Once I poured the soup in bowls, I added a dollop of the pesto on top.

And that was dinner tonight! One of these days I’ll do pictures with these posts.

Ricki Cooking School, Chapter Two – Sweet Potato Soup

I made Thanksgiving this year for the largest group I’ve made it for so far. It was very exciting. Of course, I had help. My in-laws brought Burgundy mushrooms and seven-layer cookies. My friends Vanessa and Peter brought two kinds of homemade rolls and the essential, pumpkin pie. My friends Gretchen and Geoffrey brought green bean casserole and stuffing. Geoffrey carved the bird. My father-in-law washed up. My mother-in-law helped me set up appetizers. Gretchen helped me serve. The wonderful thing about Thanksgiving is when it’s a group project like that. Everyone comes together to make a holiday for each other. It’s, you know . . . hamish.

My most successful dish was, as ever, sweet potato soup. I use my stepmom’s recipe. The thing about this soup is, having it was the first time I ever liked sweet potatoes. Or pureed soups. Or, um, a Thanksgiving meal. (I am not a fan of most of the traditional Thanksgiving foods. And when I was a kid, I was especially picky.)

So, with the hope that she won’t be mad at me for publicizing it, here’s how you make Sweet Potato Soup:

1. Chop up some garlic and onions. How many? Well, my instructions say three garlic cloves and one onion. Knowing myself as I do, I probably only used one onion but I probably used more garlic. Given that this recipe comes from my stepmother, I probably trusted her garlic amount to some extent – like, I used six large cloves and not a whole head – but I’m certain I’ve never used only three garlic cloves to make anything in the whole course of my life.

2. Melt some unsalted butter in a large pot. My instructions say one tbsp but basically you want enough to coat the bottom of the pot. Add the garlic and then, when that’s fragrant, add the onions. Let them sauté until they’re soft (so keep the heat relatively low).

3. Cut up four large sweet potatoes. Like, baby’s-head large. My instructions say to peel them, but I don’t, because a) all the nutrition is in the skin! and b) it’s a pain in the ass. Throw in the pot.

4. Add broth to cover. I used vegetable broth on Thanksgiving because I had a vegetarian at table (who didn’t care but still) and also I’m trying to use non-meat products where possible. I have done it with chicken broth before. I honestly don’t think it makes one whit of difference what kind of broth you use here. Lower heat and simmer, covered, until potatoes are soft (15 min – 1/2 an hour). (Sometimes at this stage I throw in a whole sprig or two of rosemary and then take it out before step 5. I didn’t yesterday but one could.) (Also throwing in some white wine at this stage probably wouldn’t hurt anything.)

My instructions say that this is the point where you could stop, cover and refrigerate until later. I usually do the next step first.

5. Let cool slightly, then puree, either in batches in a blender or with an immersion blender. I use an immersion blender because it is so very much easier. I really don’t think I’d make this soup if I didn’t have one. Seriously, they’re cheap, so if you like pureed soups or if you’re going to home-make baby food or anything, get one.

This is the point where I cover and chill until I’m nearly ready to serve it. Then I bring it up to a simmer again while I make garnish.

6. The garnish: This Thanksgiving I toasted walnuts and rosemary with some olive oil and salt to sprinkle on top. You could also use hazelnuts, pecans, or a mix. You could use sage or thyme instead of or in addition to rosemary. I make that while the soup is reheating (or, if I am making it all the same day I’m serving, while the soup simmers away).

7. Once it’s reheated, salt and pepper that baby (unless you did that before, which would have been fine) and then stir in some heavy cream. How much cream? I don’t know. Pour and stir until the soup is of a color and consistency that look tasty to you. Then serve and sprinkle with the garnish.

Important reheating information: Cream must be reheated delicately. No microwaving the leftovers. Heat it in a pot on medium-low to low heat. Don’t let it fully boil. If you have a whole lot of soup and not a whole lot of people, keep some aside, un-creamed, and cream it the next time you heat it up.

Easy-peasy.


Ricki Cooking School, Chapter One – Brussels Sprouts

My in-laws came over last night and they really enjoyed my Brussels sprouts and asked how to make them. The thing is, I always get compliments on the easiest food. Here is how I make Brussels sprouts (or, really, any vegetable) taste good:

1. Cut vegetable appropriately. In the case of Brussels sprouts, that means cutting off the little knobby end, and then cutting them in half lengthwise (or quartering them lengthwise if they’re huge). You’ll get some leaves that separate from the sprout this way. I keep the leaves with everything else; I love the crunch they get when the crisp up in the oven. If you want things more even, discard the leaves. (Also, if you cut them crosswise or fail to cut off the knobby end or just randomly chop them up without regard to appearance – they will still taste good.)

2. Peel some garlic cloves. If you’re like me about garlic, peel at least a head.

3. Put either in a bowl or directly on a baking sheet and toss with olive oil and salt. (You could also line the baking sheet in foil to make for easier clean up.)

4. Put the oven at 450 degrees. Put in the Brussels Sprouts on the baking sheet. When they look like you want to eat them, take them out of the oven. Maybe about 15 minutes, but sometimes less. I usually check at ten minutes, shake the pan, and put them back in.

And really, follow these directions for virtually any vegetable. Potatoes and other root vegetables will take longer to cook. (I’ve also done potatoes at 500 degrees, but really, that’s excessive, and usually results in my smoke alarm going off.) And maybe change up the spicing strategy. For instance, carrots are better with fennel seeds or cumin seeds than they are with garlic cloves. Potatoes do well with a hit of dried rosemary in addition to the cloves. (I don’t like using fresh rosemary in this particular application but it’s up to you.) Cauliflower tastes great with some mustard seeds or cumin seeds instead. A little crushed red pepper never hurt anything. But really, almost any vegetable can be cooked by dousing it in olive oil and salt and roasting it in the oven with some peeled garlic cloves until it looks/smells tasty.